An update on our stenciled bathroom floor: How it’s holding up + why I wouldn’t recommend doing this project in your own home (without reading this post first)
This post may contain affiliate links
Alright guys, several of you have asked for an update on our stenciled bathroom floor and how it is holding up, so you’re getting one today! I know it hasn’t even been that long since I finished the project, but when people ask “would you do it again?”….I say no. Or maybe I would do it a little differently.
Let me explain.
About two weeks ago, I noticed a tiny chip in the paint. It was in the corner of one of the tiles, so I thought that maybe it had something to do with being on the edge, or water being splashed from the bathtub into that spot…or something. We planned to fill in a little bit of grout and then go over the area with some more polycrylic, but we didn’t get around to it.
*EDIT: This has, by far, been one of my post popular blog posts and one of the most pinned images on Pinterest. Thank you everyone for reading! If you’re here from Pinterest, WELCOME and thank you for stopping by! If you don’t already follow me on Pinterest, please consider doing so – I pin all kinds of awesome stuff! I’m on Instagram, too!
I hope you’ll check out some of my other posts while you’re here, too!
See more of my DIY projects and inspiration [here]
Check out a home tour [here]
Check out some fashion posts [here]
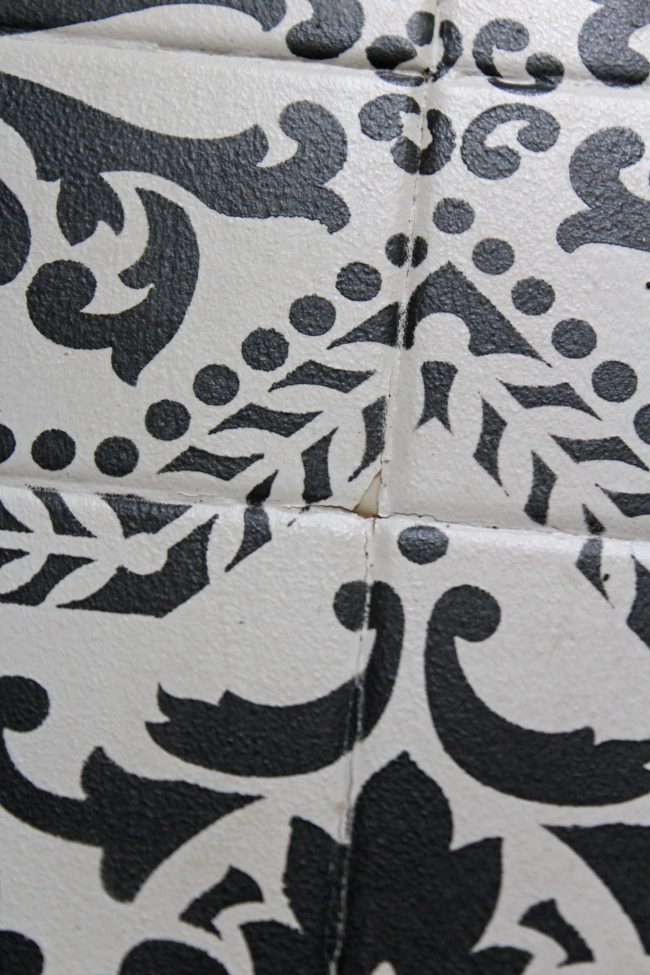
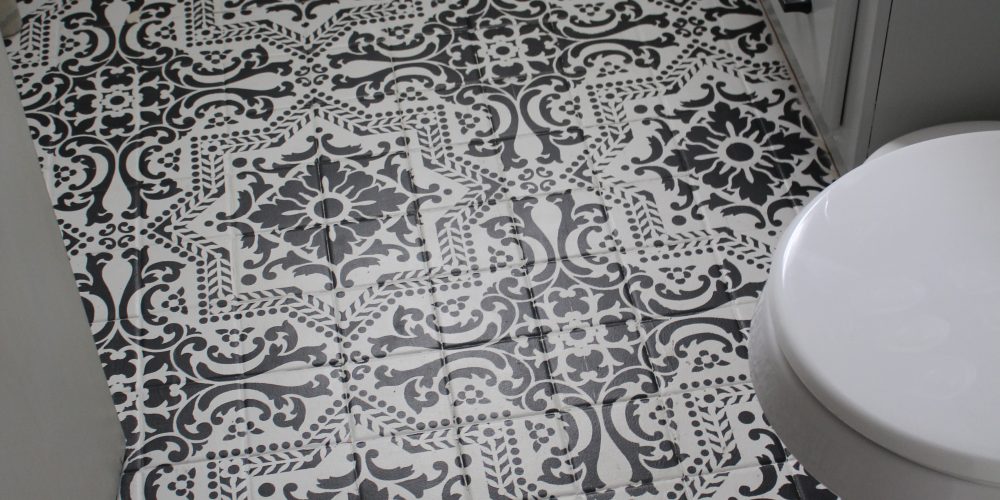
Then, this past weekend I walked into the bathroom after Henry’s bathtime and realized that there were two good-sized spots where the paint had peeled off. In separate locations from the spot I mentioned above.
Insert eye-roll emoji here.
Photos of the stenciled bathroom floor and the peeling paint are below – I’m hoping you can see the spots where the paint has peeled. I took the pictures when it was really sunny out so it was hard to get great ones!
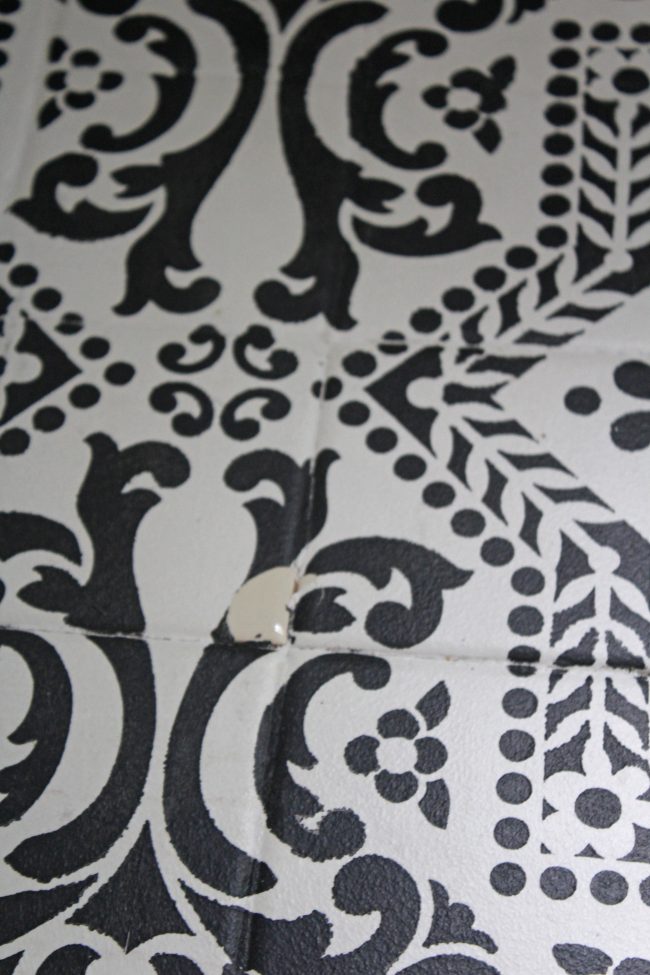
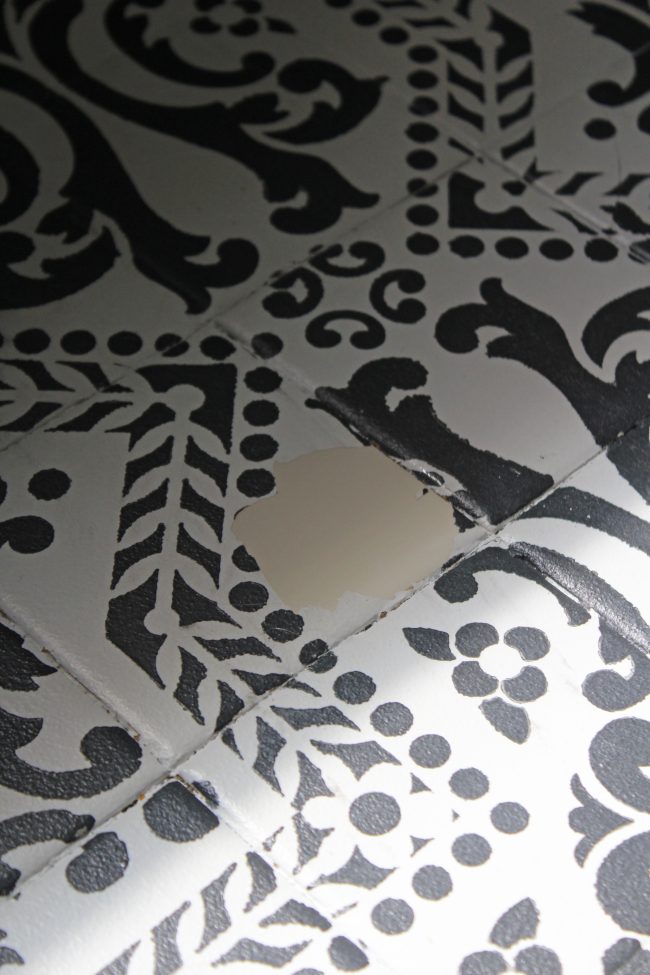
Sigh.
I knew going into this project that it was risky. Painting a slick bathroom floor doesn’t exactly scream “low risk” for goodness sake. But I figured that the tile was already ugly – it was worth a shot to give it a makeover! And if it didn’t work out, then I promised myself I wouldn’t be TOO bummed.
But guys, that small bathroom floor took me a good 3-4 days and it looked so COOL! ALSO we only have a little over 4 weeks until baby gets here. So I’m in super-nesting mode and yes, I’m bummed that the paint is peeling.
We have lived in our home for over two years and have touched just about every single surface when it comes to “fixing up” this fixer upper. I’m talking floors to ceilings. And when I think back over those two years, there really hasn’t been anything that has gone majorly wrong with our DIY projects. So, I guess we were due for a project that didn’t really work out, right?
I’m sharing an update on our stenciled bathroom floor because I blog a lot about the DIY projects that we do, and I want you to know that you can trust me! If something that I try ends up not working out, then I will let you know because I don’t want you to make the same mistakes that I do. It’s frustrating to have a project that you worked hard on not turn out the way you had envisioned!
Also, I read a lot of blogs where I find inspiration and get directions on how to do certain projects. I would want those bloggers to let me know if a DIY didn’t work out before I go in blindly and make the exact same mistakes. Ya feel me? ;)
I love home-related projects and am happy to be the “guinea pig” who goes first. And there are bound to be some things that just don’t work out perfectly.
You win some, you lose some.
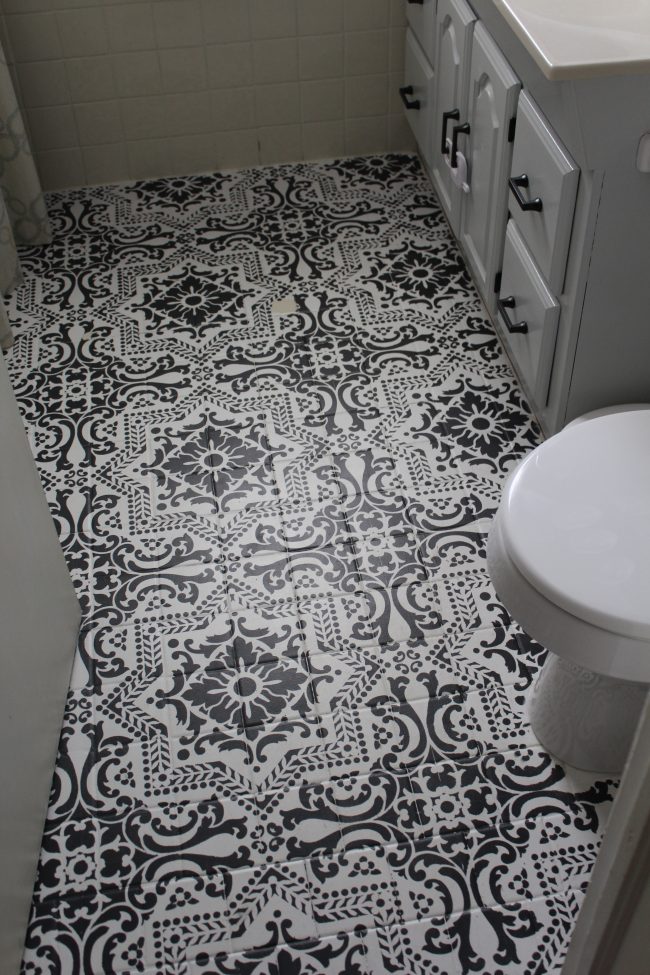
Now, if I were to attempt a stenciled bathroom floor again (or any tile floor for that matter) I would sand the tiles first. Roughing them up might make the paint grab on better and reduce the risk of peeling, but then again…I didn’t do it, so I’m not 100% sure if that would prevent it either!
I’m also not sure what exactly caused the paint to peel. It could have been the bathroom rug with its rubber backing that pulled it up, or it could have been the fact that bathrooms gets a lot of moisture. It also could have been the fact that we have a toddler who likes to drive his trucks and tractors everywhere, including the bathroom. I really don’t know.
If you still want to go ahead and paint your tiled floor, more power to you! I have seen plenty of people do so and it works out just fine. Seriously! My guess is that those people had tiles that weren’t as slick as the ones in our bathroom, so that’s why I think that sanding first might be the key.
Also, painting a wood floor would definitely be easier, so if you’re thinking about a project like that (inside or on a porch or something), I’d say go for it. Just be sure to use a primer and seal it afterwards! But if you are thinking about painting your bathroom tile, I would say “do as I say, not as I do.” OR I’d tell you to at least sand your tile before attempting!
FYI: I am going to update my DIY post with a little “warning” so that if someone lands on that post first, they can read this post as well before attempting to paint their own bathroom floors. If you have successfully painted your bathroom tiles (without peeling!) or if you have come up with a way to prevent the peeling…teach me your ways! Seriously, leave a comment below so I can learn from YOU!
Oh and PS: the vanity that I painted is still holding up perfectly and I am still as in love with the color as before! You can see more of that right [here].
As far as fixing the floor…I haven’t yet. I still have the stencil, so I could touch up those peeled spots and then go over the whole floor with another coat or two of polycrylic. Or, we could completely tear out the old tile and put new in. However…like I mentioned, we have a baby coming in a little over a month, and we are working on the upstairs bathroom renovation right now (see more of that here). So new tile in this main floor bath is a ways off. For now…I threw a rug over the peeled spots and am calling it good. I call that preserving my sanity. ;) I’ll let you know what we decide!
OK one more thing before I go: I did another stencil project that is holding up beautifully, and you can see that here.
Check out more of our home-related projects [here]!
Follow me on Instagram and Pinterest!
I hope you enjoyed this An Update on Our Stenciled Bathroom Floor blog post! If you did, please consider leaving a comment! OR feel free to ask any questions – I love to hear from you guys!




Oh, I’m so sorry to hear the floor stencil has not held up! That’s a bummer! I really appreciate your honesty with this project. That means so much! xoxo
Of course Lisa!! I appreciate transparency from other bloggers, so obviously I want to be transparent with you guys! ;) It is a bummer, but you never know until you try, right?!
You should have lightly sanded, then applied Kiltz then painted. The Kiltz would make your paint adhear permanently, thenseal with 3 coats of clear sealer.
Thanks Wendy – I’ll have to try that next time!
The first blog I read on stenciled floors says to SAND with 220 grit sandpaper and prime with 2-3 coats . .
Hi Robin – I think that would be a great idea!
Did you consider using Porch and Floor Paint- as in paint for concrete floors? I used that on my kitchen floor (original vinyl floor from 1962) and it has held up well- no topcoat necessary even! And, I did a stencil over it then… Also, I’m a HUGE believer in the one and only original Annie Sloan Chalk paint- my daughter painted her hardwood floor in her bedroom and used Annie’s paint and the lacquer for the top coat and it is BEAUTIFUL and seems to be holding up well. In my experience I’ve used Annie on my kitchen cabinets and then tried ‘other’ chalk paint brands on some furniture pieces and they need repainted already, but the cabinets are great! I swear by Annie paint!
I did not consider that!! I wonder if it would work on our slick bathroom tiles. It’s a great thought! Thank you so much for the suggestion!
You still have to sand the sheen off first.
Sheila,did you use chalk paint just on the stencil or the floor too?
what about “gripper” paint, that’s designed to stick to almost anything, along with sanding the floor. That should work?
Ohhh yes, awesome idea!! I bet that would work!
I bet Rustoleum’s tub and tile epoxy paint would work better as a base!!! It’s made for slick tile ?? Then chalk stencil over that ?
Oooh you’re RIGHT! I may need to look into that! Thanks for the suggestion!!
When I saw the original post, I thought Annie Sloan would be perfect for this! Spilled some on my work shorts 5 yrs ago & stain looks like it happened yesterday! We repainted my mothers mint green tiled bathroom walls a couple of years ago. Was a pain, of course during the hottest weekend of the year. Had to degrease, use an acid etcher to degloss tiles & special tile paint. Was a hi-gloss finish & so worth it. Still may try A.S. in my entryway. Thanks for the inspiration!
Oh that sounds amazing!! I’d love to see your entryway when you do it – feel free to send me a photo!! Thanks so much for stopping by. :)
No need to sand, but for floors, I highly recommend Rustoleum Cover Stain. It’s oil-based so use disposable brushes or rollers. No sanding required. The water based one is Bin 1-2-3, but cover stain adheres better imho. Then paint, allow to properly cure and topcoat. Polycrylic doesn’t hold up well on floors, but is great on furniture. Looks beautiful, but I know the chipping is maddening.
Thank you so much!!
It looks beautiful. However, it probably would have held up if you used the correct primer. As you can see the primer peeled up not the paint. No sanding just use ZINSSER COVER STAIN PRIMER OIL BASE(gold label). I’ve painted wall tiles held up great you can’t even starch it off.
Oh what a great idea, thank you!
Is that the Zinsser BIN primer? I just came into this post to recommend it. Some light sanding of the tiles & some oil-based primer with shellac in it, and the paint job should hold up just fine.
This is both terrifying and inspirational! :)
I’m about to give it a go for both the bathroom AND kitchen floors. We have such GROSS tile in our ‘fixer upper’ that I can’t imagine it being worse even if it did peel up.
I’ve been looking around at different primers because what I’m finding with other projects is that even the primers that say they’re amazing… aren’t.
I came across STIX (made by Benjamin Moore). Have you tried that?
I put some on a hidden tile in our bathroom to see how well it adheres and after about an hour of drying time.. I tried to scratch it off and that stuff is going NOWHERE. It’s almost too good to be true! (And this is after using all of the other ones that promised the world and scratched off right away). I know I have pretty slick tiles in there… No real texture at all… And I’m telling you THIS STUFF STICKS (and is well named).
I used the tub and tile stuff for the tiles around the bathtub. It MOSTLY stuck but was a HUGE mess and smelled horrible and has an orange peel texture AND it took a few kits to achieve a ‘meh’ result.
I think this STIX stuff might be the miracle primer I’ve been looking for!
Anyway… Fingers and toes crossed… I’m gonna give it a shot!
Thank you for the motivation and the cool-bathroom-floor inspiration!
:)
OH wow, that stuff sounds amazing!! Send me an email and let me know how it holds up – I can’t wait to hear!!
Hi
I appreciate your honesty. Your home looks beautiful!
I’ve used STIX on exterior plastic shutters as the primer coat.. they’ve been up for several years and I’ve had no chipping. We live in upstate NY and they’ve held up in full sun and freezing snow!
I’ll paint almost anything but recommend you get the right product for the job. Never cut corners and prep is everything!!! Ask in your local paint store where professionals buy not big box stores from some teenager who’s just learning.
I would sand the tiles and use something other than chalk paint. It’s not everything it’s advertised to be. There are products made specifically for floors and tile. Save the chalk paint for furniture and such.
As far as chalk paint goes. I’ve used several brands and like Anne Sloan the best but hate hate the wax finish.
Thanks for the input and ideas, Judy!
Hi Michelle how did the STIX hold up?
Came in via Pinterest.
Your paint job is only as good as your prep. And you didn’t go into that at all.
I second the STIX (but not for durability on tile floors), which used to be made by Inslx, but was purchased by BM. BM also bought their incredible HARD drying paint for woodwork and trim, Cabinet Coat. But that’s another post. Michelle, I had STIX peel of some smooth wood surface when I was experimenting with primers. It came off in sheets. I ended up using SW’s adhesive primer I mention again below.
If you cleaned your tiles with rubbing alcohol and got all the soap scum, hair spray, and other stuff we don’t think about them, either sanded (awful) or used a deglosser, THEN used an oil based, adhesive primer (Kilz is made for drywall and on tile, I doubt you’d need stain blocking) you probably wouldn’t have the peeling. SW does make a good one. Oil based primers, although oil based, are different than regular oil based paint and cover well, adhere great, and make painting smooth as buttah..
I would have considered a grout sealer, too, so it didn’t soak the paint in a different texture, AND, it’d block all the stuff you couldn’t wash out.
I’m kinda thinking of something like this for a back splash. I just can’t find anything that speaks to me, even in encaustic tiles. I have saved a post on how to make Dresden tiles, but I like your look better.
Thanks for the inspiration, even if it’s simply to prep properly! :)
Thanks for your comment, Christine! You’re quite welcome for the inspiration. ;)
I did this on our bathroom floors but without a stencil, after reading numerous posts about how well it held up. Nope! You’re exactly right! Same thing is happening to my floor too. Only thing I would recommend is using an oil-based polyurethane for durability. But with that comes the yellowing. Boooo! I hope you get your floors replaced soon and I hope I can too! ? Thanks for sharing your experience truthfully!
Ahhh bummer, sorry it happened to you too!! And of course – I always want to be truthful!
Coming along long after the comments have stopped……too little too late. Oh well!
One of the biggest issues with painting a tiled floor is that the grout and the tile will move ever so slightly – and the movement will be differential. As a result, most of the initial cracking will occur at the gout joints.
Your photos indicate paint cracking at the grout joints first. Once that happens, it’s only a matter of time before the paint begins to peel.
I’ve been meaning to try a fix for this but haven’t gotten around to it yet so can’t endorse it.
Before painting or priming, go over each grout joint with caulk: just enough to cover and fill the grout joint. The elasticity of the caulk just might prevent the paint from cracking at the grout joints.
Oh this sounds like a great idea, thank you so much for sharing!
I did all the sanding and started with the Kilz primer. My floor is doing the exact same thing as yours. I don’t think I will ever paint tile again.
Hi Tassi, what a bummer!! Several people have suggested different types of primers to try – may be worth looking into your options!
Hi, I was thinking about sanding the shine off my tiles before I do this as well.
I have a bathroom (shiny light grey tiles) and an entry, laundry and toilet with horrible dark vinyl. I am thinking of stenciling all of it the same.
Hi Judy – Sounds like a fun project! I’d love to see the finished product!