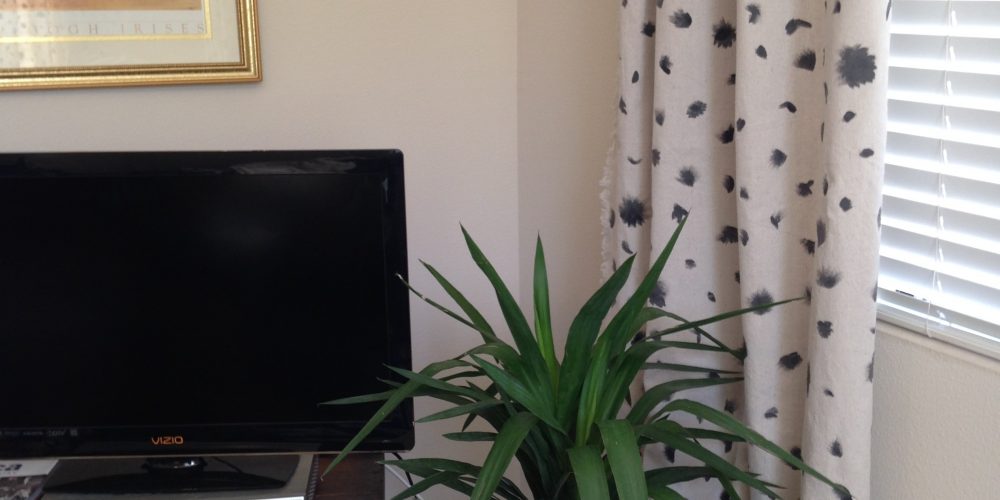
I’m not sure why finding the ‘perfect’ curtains is always so difficult. Despite searching high and low, I just couldn’t seem to find something that I loved. SO, for our new home, I decided to stop the madness and just make my own. The other day, I posted some of my inspiration photos, and I just couldn’t stop thinking about these “dalmation” curtains.
I clearly need a photographer in my life. My photo isn’t as bright and pretty as the one above, but you get the idea. We’re still working on the living area, but I think these certainly improve the room quite a bit.
I was inspired to make some “dalmation” curtains of my own after seeing the fantastic pair my friend made for her living room window. She has recently moved into an old house in Long Beach, California and is currently in the process of replacing all the windows. She found a great company who specialise in window replacement in Long Beach CA, but decided that she wanted to make the curtains herself. I am always getting inspired by my friends and when it comes to interiors, I am no different it seems!
Please excuse all of the TV/DVD player cords – it’s a work in progress!
Here’s how I did it:
Picked up some canvas dropcloth from Lowe’s. Yep, seriously. Dropcloth.
The tools:
Step one: Spread the dropcloth on the floor.
(Pax seemed to think we brought home a new bed for him)
Step two: measure out 4 foot panels and used the chalk line to mark them off. So, the 9’ x 12’ dropcloth ended up being three separate panels, each 4’ x 9’.
There will probably be some “imperfections” in the material, and that’s OK. It’s canvas dropcloth, after all. One of ours had a seam practically in the middle of a panel, but I didn’t let that bother me too much.
Step three: wash panels in the washing machine. You don’t need to do this step, but they smell a little like…canvas dropcloth if you don’t. ;)
I did two at a time, and when the first two were done and I took them out, I realized that the cut edges had frayed quite a bit and tangled with each other. I may or may not have freaked out a little. BUT, after cutting them apart, I realized that it hadn’t frayed too bad and they were still about the same size. Plus, the fraying gave them a little character! Bright side. Because I didn’t want them to shrink any more, I did not dry them. Instead, I just hung them over shower curtain rods…and every single door in our home. It looked like a haunted house for about a day, but that’s alright. At least they dried and didn’t shrink!
Step four: iron! Since I didn’t dry these, they came out just a little bit wrinkled. So, I ironed them. Easy enough, right?

Step five: paint! I laid my panels out on a non-canvas dropcloth in a low-traffic place (our guest bathroom floor) so they would have a good amount of drying time and so that I wouldn’t have little black paw prints throughout the house.
I mixed black matte fabric paint and a little bit of water.
You’ll want some small spots and some larger spots. I picked a couple “shapes” (if you can call them that) and tried to repeat those.
*Note: do not paint the spots too big, or it will end up looking like a cow hide, and that is not cute. Also, I preferred that the spots look a little lighter than pitch black (more on the gray side), and I made the mistake of mixing up a new batch of paint/water for the second panel. The paint did not come out like the first one…and the spots were entirely too big. SO that became a “test panel” that I used to make sure the paint was coming out the color I wanted. You live and learn, right?
Step six: Ask your fiance to put up some curtain rods.
 Step seven: Hang those babies up! After they’re dry, of course. I used the clip rings below that I got from Lowe’s.

 Again, please excuse the mess of cords behind our Yucca plant. We haven’t quite figured out how to hide those just yet.
Let me know what you think! And let me know if you decide to make your own curtains. I’d like to see how they turn out!
Follow Life on Shady Lane with Bloglovin’


Such a cute little space :D
Thank you so much!!